၁။ နောက်ခံရောင်ရှုပ်ထွေးသော Green Screen ဗီဒီယိုဖိုင်ကို ဖွင့်ပြီး Time Lince သို့စွဲထည့်ပါ။
၂။ ထိုနောက် Effect > Veidio Effect > Keying > Eight-Point-Garbage-Matte ကို ဗီဒီယိုဖိုင်သို့စွဲသွင်းပါ။
၃။ ထိုနောက် Effect Control > Eight –Point – Garbage – Matte ကို ကလစ်နှိပ်ပါ။ ပြီးလျှင် အောက်ပါပုံ ပတ်လည်နုတ်များကို မောက်စ်ဖြင့် အရာဝတ္ထုများပျောက်သွားသည့်အထိ လူပုံအနီးစပ်ဆုံး အတွင်းပိုင်းစွဲယူ ပါ။
၄။ ဒီအဆင့်ပြီးသွားလျှင် ကျန်တဲ့အပိုင်းကတော့ အပေါ်ကပြုလုပ်ခဲ့တဲ့အစီအစဉ်အတိုင်းပြင်ဆင်ရမည်။ ဒါကြောင့် အပေါ်ကအတိုင်းဆက်လုပ်ရအောင်..
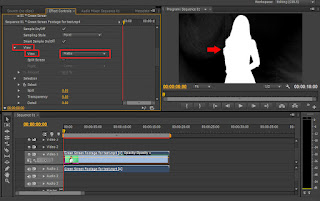
၅။ ထိုနောက် Effect > Video Effect > Primatte > Primatte Keyer ကို ၎င်းဗီဒီယိုဖိုင်သို့စွဲထည့်ပါ။
၆။ ထိုနောက် Effect Control > Keying > Auto Compute> Auto ကိုရွေးပါ။ အောက်ပါပုံအတိုင်းတွေ့ ရမည်။
၇။ ထိုနောက် ၎င်းပုံ၏အနားသားကိုအနည်းငယ်ထပ်ပြင်ရန်… Scroll Bar ကိုအနည်းငယ်စွဲချပြီး View > View – Matte ကိုရွေးပါ။
၈။ ထိုနောက် Adjust Light On/Off ၏ လေးဒေါင့်ကွက်ကို အမှန်ခြစ်ပြီး View > Matte ကနေ Comp ပြန် ရွေးလိုက်လျှင် ပုံ၏နောက်ခံအပျောက်အစက်များမရှိတော့ဘဲချောမွေ့တာတွေ့ရမည်။
၉။ ထိုနောက် ပုံ၏အနားသားကိုထပ်မံပြင်ဆင်ရန်… View > Mate ကိုပြန်ချိန်းထားပါ။ ပြီးလျှင် Correction > Correct > အောက်က Spill Sponge ကိုရွေး ပြီး ၎င်း၏အောက်တွင် Defocus Matte = 9, Shrink Matte = 2 လောက်စွဲတင်လိုက်ပါ။ အောက်ပါ အပေါ်ပုံနှင့် အောက်ပုံ ကွဲပြားတာကိုတွေ့ရမည်။ ပြီးလျှင် View> Matte ကနေ View > Comp ပြန်ရွေးပါ။
၁၀။ ထိုနောက် နောက်ခံထားမည့်ဗီဒီယိုဖိုင်ထည့်သွင်းလိုက်ပါ။
၁၁။ ပြီးလျှင် ၎င်းကို တစ်ကိုယ်ခွဲ နှစ်ကိုယ်ခွဲစသည်ပြုလုပ်လိုလျှင် ဗီဒီယိုနှင့်နောက်ခံဖိုင်တို့ကို selection ပေး ပြီး ALT ကိုဖိထားပြီး မောက်စ်ဖြင့် အပေါ် Time Line သို့စွဲတင်လိုက်ပါ။
ထိုနောက် Effect > Motion ကနေ ၎င်းဖိုင် ၂-ခုကို အခြားနေရာသို့ရွေ့လိုက်ပါ။
အောင်မြင်ပါစေ…
Saw Linux


Post a Comment